How to create password protected and encrypted zip file using the Terminal on Mac
How to Mac
In this tutorial we will learn to create password protected and encrypted zip file using the Terminal.
Let's say you have a folder containing some confidential files and you want to create a zip file that is password protected and encrypted.
Creating a plain zip file is not wise as it provides no extra security. Moreover, anyone can unzip that file and access your confidential content.
To protect the zip file from prying eyes and unauthorized access you can encrypt the zip file using a strong password. This way only authorized persons who have the password can unzip the encrypted zip file.
Alright, let's go ahead and create an encrypted zip file.
Step 1: Open Terminal
Open Terminal using Spotlight. Press Cmd + Space key and it will open Spotlight. Now type Terminal and hit enter.
Or, you can go to Finder then click on Applications then go inside the Utilities folder and select Terminal.
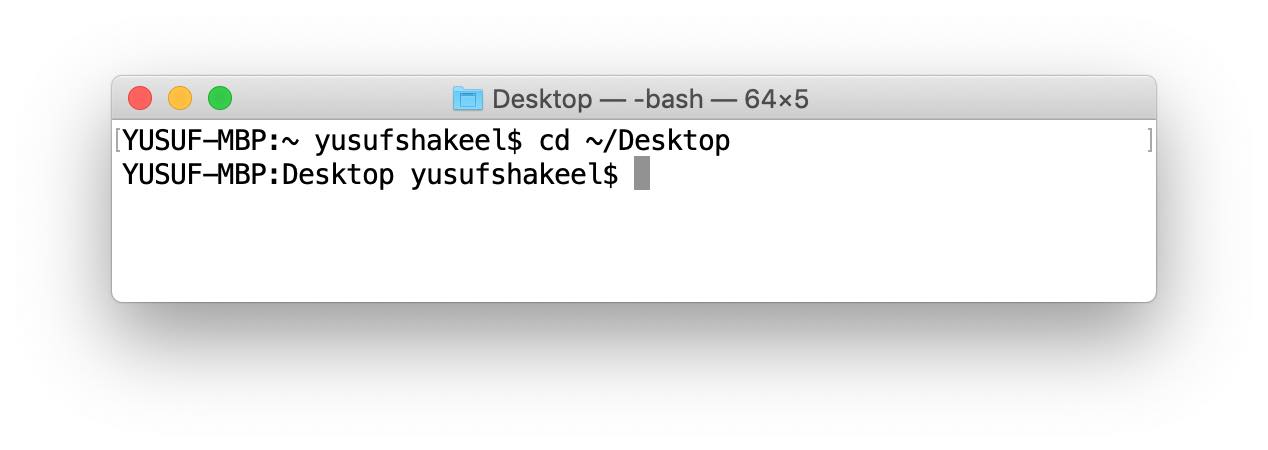
Step 2: Go to source folder location
Now go inside the folder (directory) in which you have the confidential folder that you want to encrypt.
I have my confidential folder (name: TopSecret) on my Desktop so I will go to Desktop by typing the following command in the Terminal
$ cd ~/Desktop
Step 3: Encrypt Folder
To encrypt a folder we have to type the following command in Terminal.
$ zip -er DESTINATION_FILENAME.zip SOURCE_FILENAME
Where, zip is the command to create zip files.
DESTINATION_FILENAME is the name that you want to give to your zip file. SOURCE_FILENAME is the name of your folder that you want to zip.
The -er option will create an encrypted zip file using the source folder and its content.
I will go ahead and create an encrypted zip file using the TopSecret folder that is on my Desktop. I will name my zip file as TOPSECRET.zip.
$ zip -er TOPSECRET.zip TopSecret/
It will prompt you to enter a password to encrypt the file. Enter a strong password to proceed.
Next, it will prompt you to verify the password that you have entered. Re-type the password and it will create a zip file for you.

Step 4: Unzip
To unzip the encrypted zip file all you have to do is double-click on the zip file and it will prompt you to enter the password that was used for encryption.
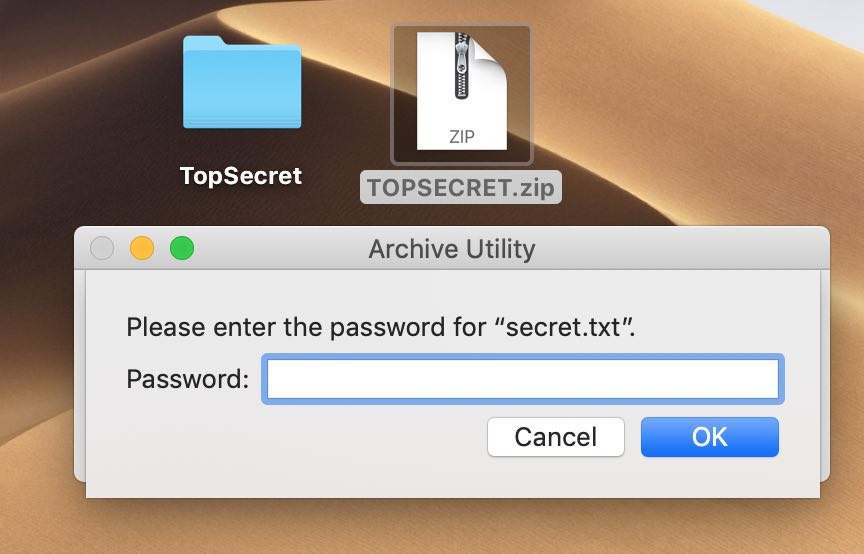
Enter a valid password and it will successfully decrypt and unzip the zip file for you.
DANGER If you forget the password then you will be unable to extract the files.
Hope you will find this tutorial helpful. Please share this with your friends on social media. Thanks for reading. Have fun :)
ADVERTISEMENT