How to setup SSH key based authentication on Linux server
Reference Server

In this tutorial we will learn to setup SSH key based authentication on Linux server.
What is SSH?
Secure Shell or SSH is a cryptographic network protocol used to communicate with servers securely.
SSH provides a secured channel in a client-server architecture allowing communication between SSH client and SSH server.
How server authenticate client?
There are many ways by which a SSH server can authenticate a client. The most basic method is password authentication, but not a most secured method. Because even though the password is sent to the server in a secured fashion, it can be easily brute forced if it is not very complex.
What are SSH keys?
SSH keys are a pair of two cryptographically secure keys that are used to authenticate a client to a SSH server. Every key pair consists of a public key and a private key.
The private key is retained by the client and kept absolutely secret. If by any chance the private key is compromised then anyone can get access to the server using the private key without further authentication. To add extra security the private key can be encrypted on the client side using a passphrase.
The public key of the SSH key pair is upload to the server that the client wants to login. The public key is added to a special file inside the user account where the client wants to login. This special file is inside the .ssh directory and called authorized_keys.
How SSH key based authentication works?
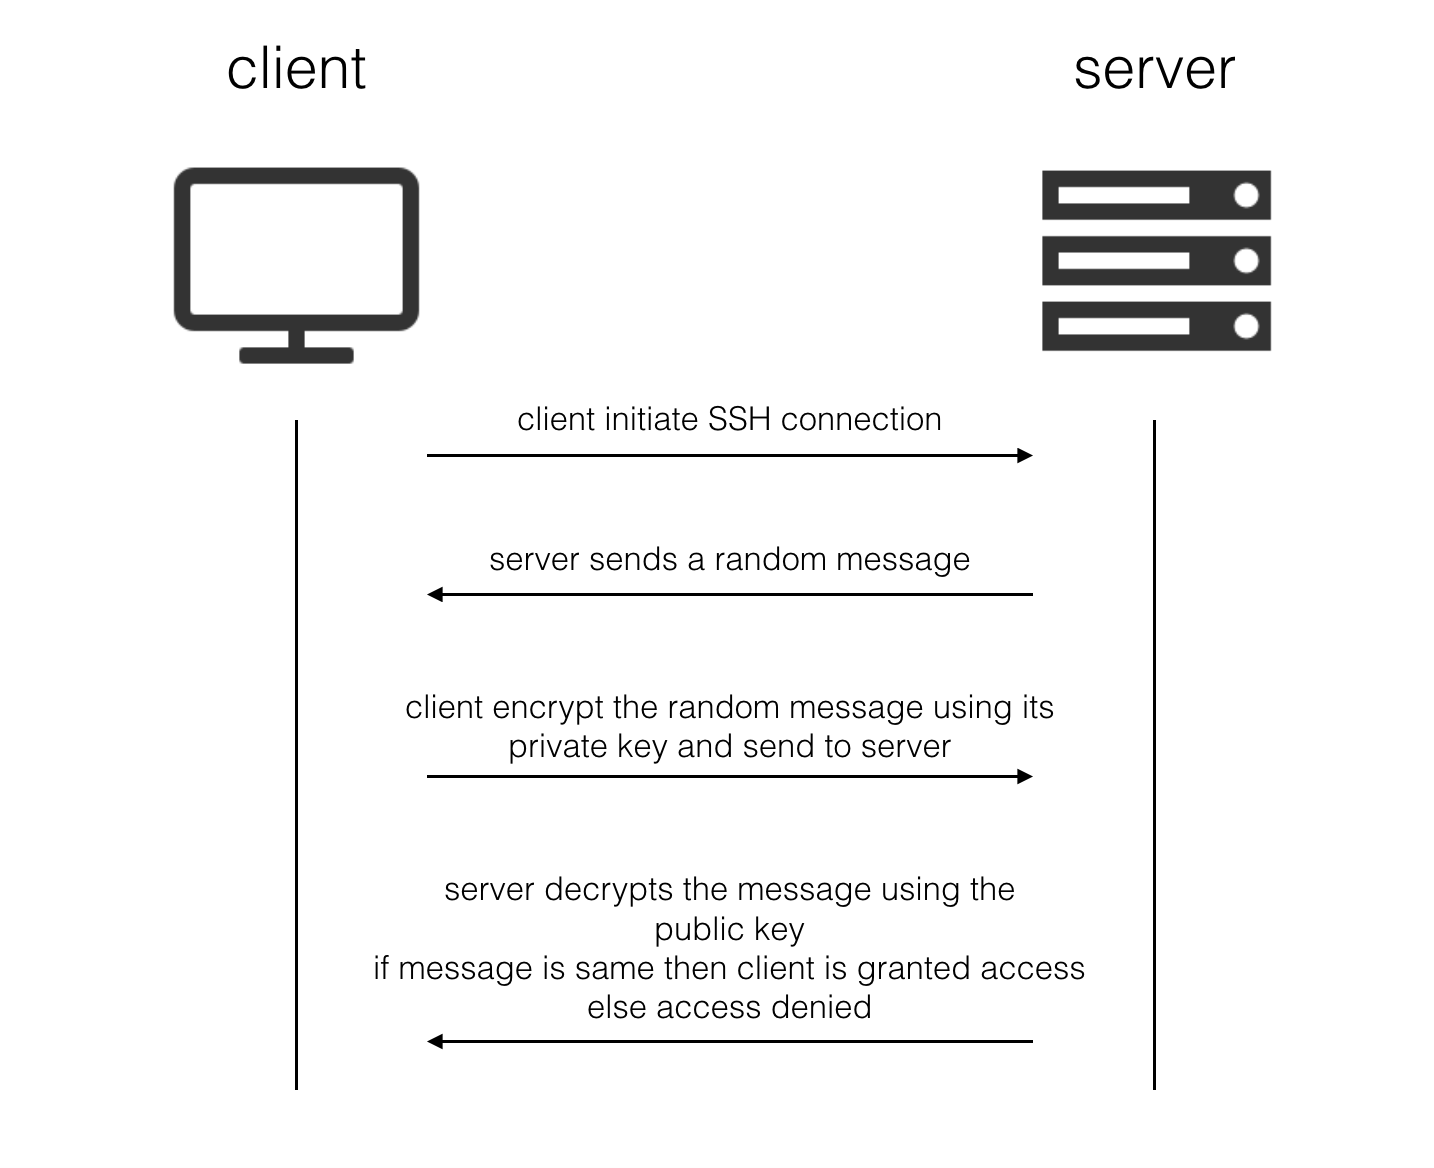
When a client wants to access a remote server it initiates SSH connection. The remote server then sends some random message to the client. The client uses its private key to encrypt the random message and sends back the encrypted message to the server. The server then uses the public key of the SSH key pair that was uploaded by the client, to decrypt the encrypted message sent by the client. If the decrypted message is same as the message initially sent by the server then the client is authenticated and granted access. Otherwise the client is denied access to the remote server.
Now the interesting part of this tutorial.
How to create SSH keys?
Client side
Open the terminal and go to the user directory by using the cd command.
YUSUF-MacBook-Pro:~ yusufshakeel$ cd
Now move inside the .ssh directory.
YUSUF-MacBook-Pro:~ yusufshakeel$ cd .ssh
You can use the ls -la command to list the public-private keys inside the .ssh directory.
YUSUF-MacBook-Pro:.ssh yusufshakeel$ ls -la
total 40
drwxr-xr-x   5 yusufshakeel  staff   170 Mar  8 09:17 .
drwxr-xr-x+ 73 yusufshakeel  staff  2482 Mar  4 12:32 ..
-rw-------   1 yusufshakeel  staff  1766 Jan 24  2015 github_rsa
-rw-r--r--   1 yusufshakeel  staff   405 Jan 24  2015 github_rsa.pub
-rw-r--r--   1 yusufshakeel  staff  8844 Mar  7 13:04 known_hosts
Now to create a new SSH key pair we use the ssh-keygen utility included with the standard OpenSSH.
You will be asked to enter the file name where you want to save the key.
If a file name already exists they you will be asked whether you want to overwrite the existing file. If you overwrite an existing key being used by some other application, then they will no longer be able to authenticate. So, choose this carefully.
Then you will be asked to enter a passphrase (this is optional). If you don't want to set a passphrase then simple press ENTER and continue.
What is the use of passphrase?
The private key is kept absolutely secret with the client and never exposed on the network. The passphrase is used to decrypt the private key on the client. So, it provides an extra security.
If you choose to set a passphrase then you will have to enter the passphrase everytime you use the key.
In this example I will be saving my ssh key by the name yusufshakeel_rsa and I will not set the passphrase.
YUSUF-MacBook-Pro:.ssh yusufshakeel$ ssh-keygen
Generating public/private rsa key pair.
Enter file in which to save the key (/Users/yusufshakeel/.ssh/id_rsa): /Users/yusufshakeel/.ssh/yusufshakeel_rsa
Enter passphrase (empty for no passphrase):
Enter same passphrase again:
Your identification has been saved in /Users/yusufshakeel/.ssh/yusufshakeel_rsa.
Your public key has been saved in /Users/yusufshakeel/.ssh/yusufshakeel_rsa.pub.
The key fingerprint is:
SHA256:BmtTxJHRvf2B1M/kWOLuzWf83eF14ZXOqZ45JB1nkxt yusufshakeel@YUSUF-MacBook-Pro.local
The key's randomart image is:
+---[RSA 2048]----+
|  oo+o.o*ooo     |
|  . ...+= =      |
|   .o.Bo+. .     |
|   ooB..oE  +    |
|   . SOo..       |
|      *.*        |
|     . * +       |
|  .o  o + .      |
| ++o.+           |
+----[SHA256]-----+
Note! The above key fingerprint and key's randomart image is intentionally modified. Do not try to use them as they are only for demonstration.
The new ssh key pair is created and can be listed using the ls -la command.
YUSUF-MacBook-Pro:.ssh yusufshakeel$ ls -la
total 56
drwxr-xr-x   5 yusufshakeel  staff   170 Mar  8 09:17 .
drwxr-xr-x+ 73 yusufshakeel  staff  2482 Mar  4 12:32 ..
-rw-------   1 yusufshakeel  staff  1766 Jan 24  2015 github_rsa
-rw-r--r--   1 yusufshakeel  staff   405 Jan 24  2015 github_rsa.pub
-rw-r--r--   1 yusufshakeel  staff  8844 Mar  7 13:04 known_hosts
-rw-------   1 yusufshakeel  staff  1679 Mar  8 09:27 yusufshakeel_rsa
-rw-r--r--   1 yusufshakeel  staff   418 Mar  8 09:27 yusufshakeel_rsa.pub
The yusufshakeel_rsa is the private key and must be kept absolutely secret. The yusufshakeel_rsa.pub is the public key and can be uploaded to the server.
Now we need the public key of the ssh key pair that we just created. Copy the content of yusufshakeel_rsa.pub file.
YUSUF-MacBook-Pro:.ssh yusufshakeel$ cat yusufshakeel_rsa.pub
ssh-rsa AAAADAQ3NzaC1yc2EAAABAAAABFDL8ABAQCfPTHmKDyzpu88l8ehBnoOysR/VNEx/Rg63OAwzknFd4fkl/jJXPf539OBxm7lh94xcELm+NXaJcHu6M/7vhwagvSyj9PmL7KPjYZ7PrFYlE0DlOgSRUp0LOM6cHvmtwFVMcPSFN963aH0uzd5vsNCVbOh4tyeVhR4NAlUz5HCXxLNgM6tbkCT7ke3UpC9o7heIBOu3nD8SJL6GrYzLFOjwo9JZriud66BY3quN4Il1BGtwf1sdT7VCYfR7F18hRtSA7+g7dMg3UNXQ5YdBKpZtEFiRK+zM77LY/EpxyYi4Q9C+XYzRt0WfHvCaIF6jfdiYa5hA7A0ixWFw8mB yusufshakeel@YUSUF-MacBook-Pro.local
Note! The above public key is intentionally modified. Do not try to use it as it is only for demonstration.
Server side
Now its time to add the public key to the server. For this we first need to login to the server and go to the user directory using the cd command. Now check if the .ssh directory exists.
If the .ssh directory is present then move inside using the cd .ssh command.
If the .ssh directory is not present then use the mkdir .ssh command to create it and then move inside using the cd .ssh command.
And restrict the .ssh directory permissions with the following commands.
$ chmod 700 .ssh
Now use the vi command to open authorized_keys file and paste the public key.
$ vi authorized_keys
Paste the yusufshakeel_rsa.pub file content
ssh-rsa AAAADAQ3NzaC1yc2EAAABAAAABFDL8ABAQCfPTHmKDyzpu88l8ehBnoOysR/VNEx/Rg63OAwzknFd4fkl/jJXPf539OBxm7lh94xcELm+NXaJcHu6M/7vhwagvSyj9PmL7KPjYZ7PrFYlE0DlOgSRUp0LOM6cHvmtwFVMcPSFN963aH0uzd5vsNCVbOh4tyeVhR4NAlUz5HCXxLNgM6tbkCT7ke3UpC9o7heIBOu3nD8SJL6GrYzLFOjwo9JZriud66BY3quN4Il1BGtwf1sdT7VCYfR7F18hRtSA7+g7dMg3UNXQ5YdBKpZtEFiRK+zM77LY/EpxyYi4Q9C+XYzRt0WfHvCaIF6jfdiYa5hA7A0ixWFw8mB yusufshakeel@YUSUF-MacBook-Pro.local
And save the content using :wq command.
How to access the server using ssh key?
Open the terminal and type in the following command.
$ ssh -i /Users/yusufshakeel/.ssh/yusufshakeel_rsa root@example.com
Note! replace the root@example.com as per the server you want to access.
ADVERTISEMENT